The Foundational Building Blocks of iOS UI
This is the first of a (large) set of blog posts I’m planning focused on the fundamentals of building user interfaces for iOS. Whether you’re brand new to UI development or have years of experience building UI on iOS already, I hope these posts will help you strengthen your understanding and hone your skills, building up your ability to consistently design and execute polished UI.
Instead of jumping straight into a fully-functional UI, we’ll instead start from the ground up and reinforce the fundamentals before building up to more advanced topics. Each post will start by calling out previous posts it would be helpful to read first - you of course don’t have to, but I’ll be writing them assuming you’ve read those already. I’m also planning on keeping these posts up-to-date as platform changes occur, rather than treating them as a snapshot in time, so you can use each post as a reference guide for years to come.
When you look at an app running on your device, you should see a single, cohesive interface that fits together seamlessly. Physical interfaces, like the keyboard on your computer, are made by attaching smaller components together to create a single product. Software interfaces are made the same way - building the final rendered pixels you see on screen from layers of building blocks beneath. Unlike your keyboard, though, you can’t take an app’s UI apart to see how it’s built.
On iOS, there are many levels of abstraction between how you define a UI in code and the pixels drawn to the screen. Each of these levels of abstraction solves some very interesting problems and can be fascinating to learn about. Let’s start by talking about one of the most important UI frameworks for iOS: UIKit.
UIKit is a powerful framework that abstracts away many of the technical challenges in rendering UI as well as managing interactions with that UI. There are many ways to approach building UI on iOS, so you may wonder: why start with UIKit? The answer is it serves as somewhat of a central point for building UI. There are higher level frameworks like SwiftUI built on top of UIKit that abstract away some of the complexities of building UI, but when you reach limitations with these frameworks you typically need to drop down to UIKit, or at least understand how UIKit works to figure out why things work the way they do in SwiftUI. And there are lower level frameworks, all the way down to the GPU shaders, which are incredibly powerful and can enhance your UI in fantastic ways, but these are easy to plug into UIKit as needed so we’ll explore them as they come up in different topics. I believe UIKit is the best spot to start building your foundational understanding of the world of iOS UI.
To understand how UIKit works, we’ll start with the base component from which even the most complex screens can be built: the view.
Quick aside: This post is going to get quite technical at points, but don’t get discouraged if you need to re-read a few sections to understand them. Most of the time you won’t need to think through all of these details while writing your UI, but taking the time to understand them up front will give you a solid foundation for building your understanding of the UI systems you’re interacting with. With that out of the way, onward!
What’s a view?
Views are the fundamental unit of UIKit. Even the most complex interfaces can be broken down into a set of views, each representing a small piece of the larger interface. One view might be a label showing the title at the top of the screen, while another view might be a button telling the app to navigate to a new screen when tapped. And views can contain other views, serving as a container grouping a set of views together so they can be used as one component.
For now let’s just consider a single, standalone view. There are two main components to think about when controlling where our view is drawn: its size and its position.
Controlling a View’s Size
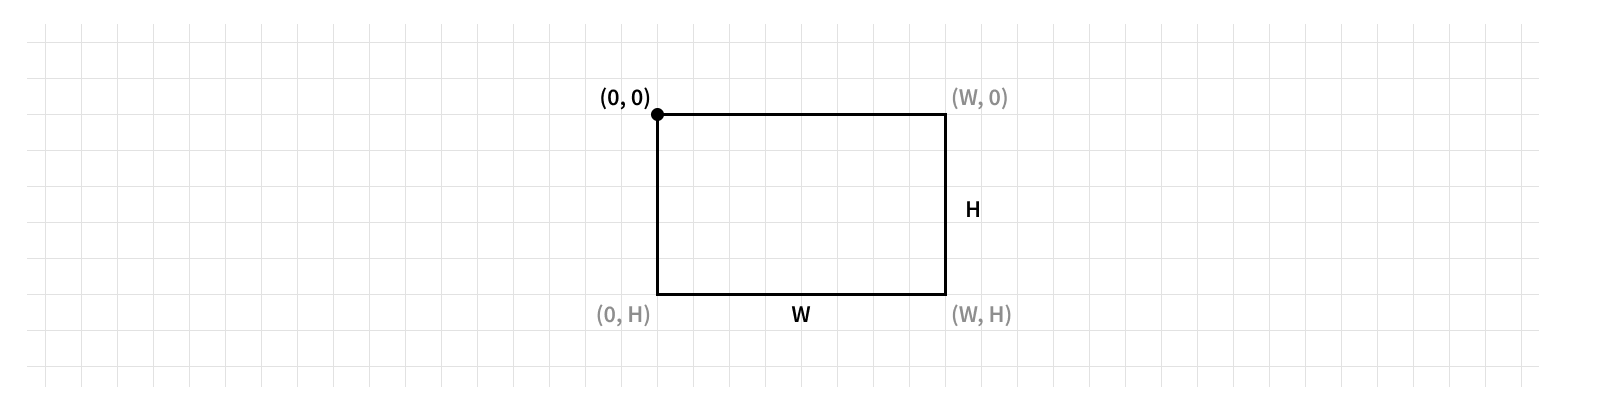
A view’s size is determined by its bounds. Apple’s documentation describes the bounds as a “rectangle [that] describes the view’s location and size in its own coordinate system.” Sounds like we’re back in math class, doesn’t it? Let’s break that definition down.
We’ll start with the first word: it’s a rectangle. Specifically, the bounds property is represented by a CGRect, which is made up of a point (the origin) and a size (the size). The size of a rect refers to… you guessed it, its size, made up of a width and height. The origin refers to the x and y coordinates of the rect’s top left corner.
If you’ve worked with other graphics systems, this definition of the origin may be surprising to you. The default coordinate space convention in Core Graphics, the framework that defines the geometric structures we’re discussing here (hence the “CG” prefix for CGRect), is for the origin to be located at the bottom left corner and position values increase as you move up and to the right. iOS uses a flipped coordinate space where the space is vertically flipped so the origin is at the top left corner instead. The vast majority of the time on iOS you’ll be using a flipped coordinate space, so it’s generally safe to assume that unless its called out explicitly, the origin of a rect refers to its top left corner and position values increase as you go down and to the right.
Now let’s talk about the second half of the definition: the rectangle is defined in the view’s own coordinate space. You can think about coordinate spaces as defining what the values are relative to. This is particularly important for the position, since having a position value is meaningless if you don’t know where (0, 0) is. But for the bounds this is simple: the view is measuring these values relative to itself. The vast majority of the time1 a view’s bounds will have an origin of (0, 0), making it easy to find any point within it by measuring from its top left corner.
Each of the numerical values that make up the size and origin are measured in points, the standard unit of measurement for UI on iOS. Using points helps to keep measurements the same across different devices, even if they have different pixel densities2.
One important thing to note is a view’s width and height will always be positive. Setting either of them to a negative value can have the unexpected consequence of changing the view’s origin, so it’s best to only set positive size values.
Now you know where a view’s size is defined. But what about its position? Well, assigning it a position on its own would be somewhat meaningless - we need to position it relative to something, right? So first, let’s talk about view hierarchies.
View Hierarchies
The real power of views comes from their ability to be composed into structures, known as view hierarchies. View hierarchies are constructed from parent/child relationships, which maps to UIView’s superview and subviews properties. A view can be nested inside of another view, making it a child (or subview) of its parent (or superview). This is a 1:N relationship, meaning a view can have any number of subviews, but it can only have one superview.
You can think about this like nested boxes. When you open a box, it might be empty. Or, it could have one or more boxes inside of it. This is like a view’s subviews, which is an array of views ([UIView]). As you open the boxes, each box might have been found inside of another box - but it couldn’t be directly inside of more than one. This is like a view’s superview, which is an optional view (UIView?).
A view hierarchy is constructed by adding subviews to a parent, using the addSubview(_:)method.
myView.addSubview(someOtherView)
The order of a view’s subviews is important, since this lets the system know how to handle overlapping views. If you add all of your subviews at once, it’s easy to rearrange the method calls to get the right ordering, but sometimes you need to dynamically add subviews over time. For these cases you can use the method variants designed to insert above or below another subview. This order will be reflected in the subviews array, where the first element is on the bottom and the last element is on the top.

Since a view can’t have more than one superview, adding a view as a subview will automatically remove it as a subview from its previous superview. Of course, you can also explicitly remove a view from the hierarchy by calling its removeFromSuperview() method.
myView.removeFromSuperview()
One Layer Deeper
To understand how UIKit works, we’re going to go one level deeper to a key framework UIKit is built on: Core Animation.
The basic type you’ll interact with in Core Animation is a CALayer. Just like how UIKit is built on top of Core Animation, views are built on top of layers. In fact, with only a few exceptions, most views use a layer to render their content to the screen. You can access a view’s underlying layer via its layer property. This underlying layer is ultimately responsible for the content displayed on the screen. Note you’ll most often interact with layers through a view, but you can also create one independently without it belonging to a view.
The power of UIKit, and as such the views defined using UIKit, comes from the ability to provide user interaction. Views are the mechanism by which interfaces can support touch interactions like tap events, hook into system controls like the on-screen keyboard, adapt to device settings like Dark Mode, expose our interface to assistive technologies like VoiceOver, and much more. But when it comes to actually displaying content on the screen, layers are the real powerhouse.
Layers can be composed into a hierarchy just like views can. This API works almost exactly the same as with a view hierarchy, reflected in the layer’s sublayers and superlayer properties. In fact, building up your view hierarchy will build up a layer hierarchy as well. Each time you add a view as a subview to another view, that view’s layer is added as a sublayer of the other view’s layer. It’s important to never break these layer relationships by modifying them directly. Let the view manage its layer’s hierarchy relationships - bad things will happen in your app otherwise! But while you shouldn’t directly add or remove view-managed layers from the hierarchy, you can add independent layers.
At a technical level, the layer hierarchy tells the GPU how to composite the different backing stores to create the final image to display on screen. If that sounds very technical… well, it is. But don’t worry, you don’t need to fully understanding all the ins and outs of the rendering system to use layers. The layer hierarchy abstracts most of that away! The key thing to take away is layers act like the source of truth for how our UI is drawn to the screen.
Much of the functionality we associated with views is really just a reflection of functionality provided by its layer. We discussed sizing views by their bounds, but a view’s bounds always matches its underlying layer’s bounds3. So everything we discussed about sizing views was really about sizing layers!
Controlling a Layer’s Position
It’s time to talk about positioning. Finally! Since we just learned this sort of functionality really lives on layers, let’s start with positioning layers. Remember when we said in order to talk about positioning we need to have something to position relative to? That something comes from the hierarchy - specifically, a layer is positioned relative to its superlayer.
A layer’s position property represents its position in its superlayer’s coordinate system, represented as an X and Y coordinate. As we just learned, a layer’s coordinate system is defined by its bounds. This means a layer will be positioned relative to the origin of its superlayer’s bounds, offset by its position.
Since each layer is relative to its superlayer’s coordinate system, moving one layer to a different place on the screen will move all of its sublayers with it. This is incredibly powerful, as it lets you reason about a subtree of the hierarchy in isolation, without knowing where on the screen it will be displayed or what else might be shown outside it.
If you’ve worked with views or layers before, you’re likely familiar with the frame property. The frame is a computed value representing the rectangle where the layer resides in its superlayer’s coordinate space. That rectangle is computed from a combination of the layer’s size and position, so updating the layer’s bounds.size or position will inherently update its frame. We can write some sample code to see this in action.
let layer = CALayer()
layer.bounds.size = CGSize(width: 300, height: 200)
layer.position = CGPoint(x: 1000, y: 1000)
layer.frame // (x: 850, y: 900, width: 300, height: 200)
Is that what you expected the frame to be? Let’s break it down.
The first thing you’ll notice is the frame’s size is the same as the bounds’s size. Since the layer is the same size in both coordinates systems, it makes sense these sizes should be the same.
How does the bound’s origin fit into this though? Since it defaults to (0, 0) it’s tough to say. Let’s see what happens when we change it.
layer.bounds.origin = CGPoint(x: 100, y: 100)
layer.frame // (x: 850, y: 900, width: 300, height: 200)
The answer is… nothing! Changing the origin of the bounds has no effect on the frame. Since changing the origin of a layer’s bounds modifies its own coordinate system, it will affect the positioning of its sublayers, but it won’t affect its own positioning in its superlayer, since its position is defined in its superlayer’s coordinate system.
So where did the frame’s origin come from? Notice the origin of the frame is offset from the position by exactly half the width in the X direction and half the height in the Y direction. This is no coincidence! By default, a layer’s position represents the position of the center of the layer.
This isn’t always the case though. A layer’s anchorPoint controls where in the layer its position refers to. This is one layout property that isn’t measured in points; rather it’s defined in the unit coordinate system. This means the anchor point is made of a set of X and Y coordinates where (0, 0) refers to the top left corner of the layer and (1, 1) refers to the bottom right corner of the layer.
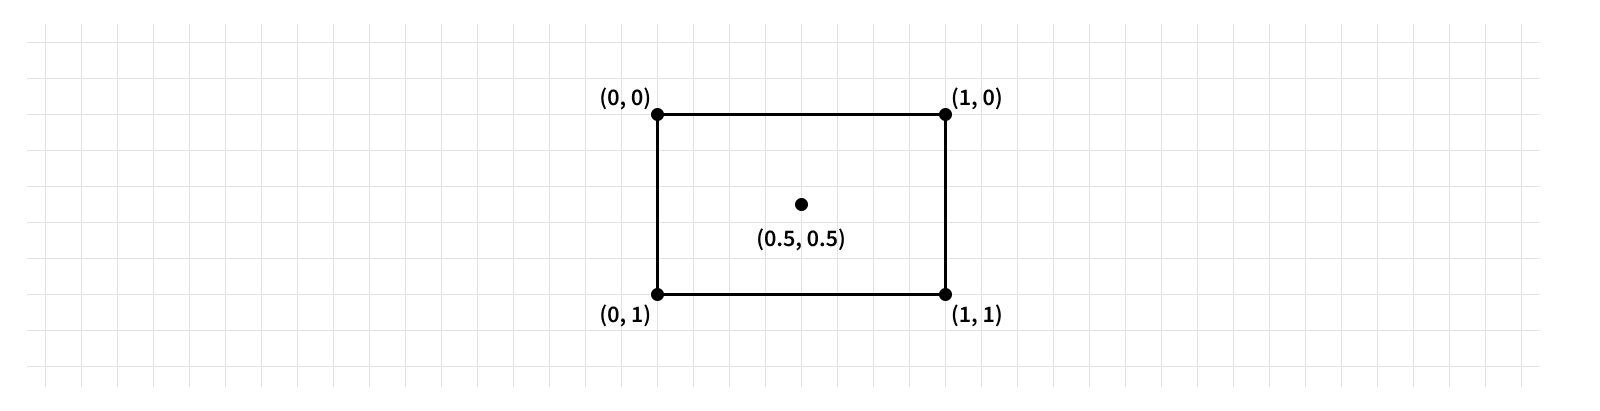
The anchor point isn’t constrained to the layer’s bounds either - you could set an anchor point with values less than 0 or greater than 1 and anchor your layer to a point outside of its visible frame. This is very helpful for creating certain visual effects, but in the vast majority of cases the anchor point should be left at its default value of (0.5, 0.5) to keep things simple and consistent.
Controlling a View’s Position
Just like with layers, views provide a property to control their position relative to their superview: their center. And just like with layers, we can check our view’s frame to see how changing the center updates it:
let view = UIView()
view.bounds.size = CGSize(width: 300, height: 200)
view.center = CGPoint(x: 1000, y: 1000)
view.frame // (x: 850, y: 900, width: 300, height: 200)
This works exactly the same as layers, but it’s “simplified” by the fact that there’s no anchor point for the position to be relative to - it’s always the center.
But wait! Remember views are always backed by layers. Let’s see what our backing layer looks like now.
view.layer.bounds // (x: 0, y: 0, width: 300, height: 200)
view.layer.position // (x: 1000, y: 1000)
Updating our view’s bounds and center updated the backing layer’s bounds and position to match. Makes sense, the view is just a wrapper around the layer. But what happens if we update the layer’s anchorPoint?
view.layer.anchorPoint = CGPoint(x: 0.25, y: 0.25)
view.center // (x: 1075, y: 1050)
view.frame // (x: 1000, y: 1000, width: 300, height: 200)
Oh no! Our view’s center is no longer at its center.
Now, before you get too worried, remember we just said the vast majority of the time you’ll want to leave the backing layer’s anchor point at its default value, making the view’s center fit its name. But it’s important to remember if you do use a non-standard anchor point, you’ll need to account for that when positioning your view.
Finding the Center
Knowing we’re working with the actual center of a view seems like it would be useful, huh? Let’s see if we can write a helper to ensure we’re working with the actual center.
When our anchor point is (0.5, 0.5), this is trivial - the center will be correct. So what about if one of the axes is less than 0.5? Well, we need to add to the center to get the actual center - specifically the width multiplied by how far off it is from 0.5. And likewise when an axis of the anchor point is greater than 0.5 we need to subtract a value from the center.
I’ll spare you any longer explanation of the math, we end up with something like this:
extension UIView {
    var actualCenter: CGPoint {
        get {
            CGPoint(
                x: center.x + (0.5 - layer.anchorPoint.x) * bounds.width,
                y: center.y + (0.5 - layer.anchorPoint.y) * bounds.height
            )
        }
        set {
            center = CGPoint(
                x: newValue.x + (layer.anchorPoint.x - 0.5) * bounds.width,
                y: newValue.y + (layer.anchorPoint.y - 0.5) * bounds.height
            )
        }
    }
}
Being able to work with a view’s true center can make reasoning about positioning views simpler. But how do we go from knowing the center of views to building up more complex view hierarchies? Over the course of this series of posts, as we explore a wide variety of concepts related to UI, we’ll build up a large collection of these sort of utilities (and learn about some helpful open source frameworks we can utilize) to help make working with views and layers much easier.
This is only the beginning.
-
Scroll views are the notable exception. ↩
-
This is also known as the screen’s scale. Most modern iOS devices will have a scale of either 2 or 3. ↩
-
In general, when a view provides a property mirroring one on its layer, it’s best to use the view’s property rather than interacting with its layer directly. There are often side effects to setting view properties that make this preferable. ↩